CNN notes
接触了很多图像处理,也接触了卷积,也写过Bp神经网络,感觉学得还是比较杂。
打算系统学习一下卷积神经网络(Convolutional Neural Network,CNN)。
学习网址是B站:https://www.bilibili.com/video/BV1e54y1b7uk
顺便想试一下用英文写博客。So,Let’s get started!
Chapter 1
Section 1
In section 1,it introduces the convolution from the full connection.
Section 2
In section 2, it introduces the convolution kernel of the example of vertical edge detection, which is also called a filter. Then it introduces how convolution is calculated. The example of vertical edge detection is easy to understand, and the visualization is also vivid.
For the example of vertical edge detection filter, it is as follows
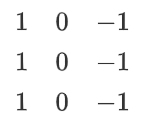
When the nearby pixels are not much different, due to the 1 and -1 on the left and right of the convolution kernel, when the kernel passes the image, the final calculation result will tend to 0. But when there is a vertical edge, the gradient changes a lot from left to right. If it changes from light to dark, the result of light pixel multiplies the 1 add the result of dark pixel multiplies the -1 will be huge. On the contrary, if it changes from dark to light, the result will be small. So when the kernel passes the whole image, the edge features are extracted.
Section 3
In section 3, it introduces the horizontal edge detection kernel and other filters, such as the Sobel filter, Scharr filter. And it pointed out that the kernel can extract other features if the parameters of the kernel can be learned. And it can extract the features better and it will be more suitable for our needs.
Section 4
In section 4,it introduces the padding. It talked about the disadvantages of convolution at the beginning.
1. The convolution will decrease the size of the image. If the original image’s size is , and the step is , the result’s size will be after the $ f \times f $ convolution
2. The convolution will only calculate the edge of the image once, the result of extraction will be poor. So after the convolution, the image edge information is lost.
If we want to solve the problem above, we can use padding, which is adding the around the image.If the number of padding is ,then the original image will be .If the result size is equal to the original image after convolution, the convolution is said “same convolution”.If we use “same convolution”,we can get .So .And this is why the filter’s size is always an odd number. If the size is an even number, it can’t be padding symmetrically.
Section 5
In section 5,it introduces the “strided convolution”,whose step is not 1.
According to the section above,we can summarize that if the image’s size if ,and the padding number and step is and ,then the final image’s size will be after the convolution.
At the end of the video, it tells that the definition of “convolution” in the math book is symmetric about the negative diagonal and then multiply correspondingly and get the sum. But in the deep-learning, we cancel the process of symmetry. And we call cross-multiplication convolution.
Section 6
In section 6, it introduces how the convolution works if it has multi-channels.
If the original image,and the step is 1,no padding,the size of result will be after the convolution of kernels whose size is .
Section 7
In section 7, it connects the convolution neural network with the non-convolution forward network. If we understand convolution as , then the kernel can be understood as and the image can be understood as . So we can add bias and non-linear functions like non-convolution forward network and get the output finally. Noting that a convolution kernel corresponds to a bias, so if the kernel size is , it will have parameters. And we can find that the number of parameters is nothing to do with the size of the input image. It is better to avoid overfitting.
Section 8
In section 8, it gives an example of the convolution neural network. The network constitutes multi-layer convolution, pooling and fully connected, flattening, and logistic regression. Generally, as the network deepens, the height and width will decrease and the channels will increase.
If you want to learn more about flattening and logistic regression such as softmax, you can refer to the website below.
https://zhuanlan.zhihu.com/p/105722023
Section 9
In section 9, it introduces pooling. The pooling can also be understood as a filter, which also has size and step. An example of “max pooling”, which is used most commonly, is taking the max value of the area where the filter passes by. And the “average pooling” is taking the average. Pooling is independent of one channel, and the image will keep the original number of channels after pooling. The role of pooling that I understand before is to reduce the calculation. And I think it will lose some information. But after watching the video, I have some other understanding. If one part doesn’t include features, the max value of the part will also be small, so we get the max value will not lose the information that we need. And if one part includes features, the max value is enough to express the feature.
Section 10
In section 10, it gives an example of a network. The network constitutes the convolution layer, pooling layer, and fully connected layer. The layer number is the number of a layer that have parameters generally. The convolution layer and the pooling layer are known as one layer because the pooling layer has no parameters. A Fully connected layer is like the hidden layer to the output layer in a non-convolution network.
Section 11
In section 11, it shows the advantages of convolution compared with fully connected. One is parameter sharing and the second is the sparsity of connections. The number of fully connected layer parameters is large, and it will increase with the increased size of the input image. Relatively, the number of convolution parameters is small, and it will not increase with the increased size of the input image. The convolution is parameter sharing, so the parameter will play a role in the whole image. If the convolution filter can extract a feature, then the same feature in different locations will also be extracted. The convolution builds the sparse connection with fewer parameters. In short, the result of convolution depends on one part of the image. And the result reflects the connection between this part. This kind of connection is important because the same feature in the different images is not exactly the same. In other words, the feature you extract in the new image may be similar to the feature you extract when you trained, maybe there are only a bit pixels changes. If there are some similar features, it will be thought of as the same feature after convolution.
Section 12
It is an interview about Yann in section 12.
OK, this is all of the learning notes for the first chapter. After learning the first chapter, I have a clearer understanding of how a network works. Next, it is more important to learn how to design hyperparameters to make the network work well.
第二节
果然是试试就逝世,感觉还是中文通俗易写一点哈哈
2.1
概述接下来要讲一些常用的网络
2.2
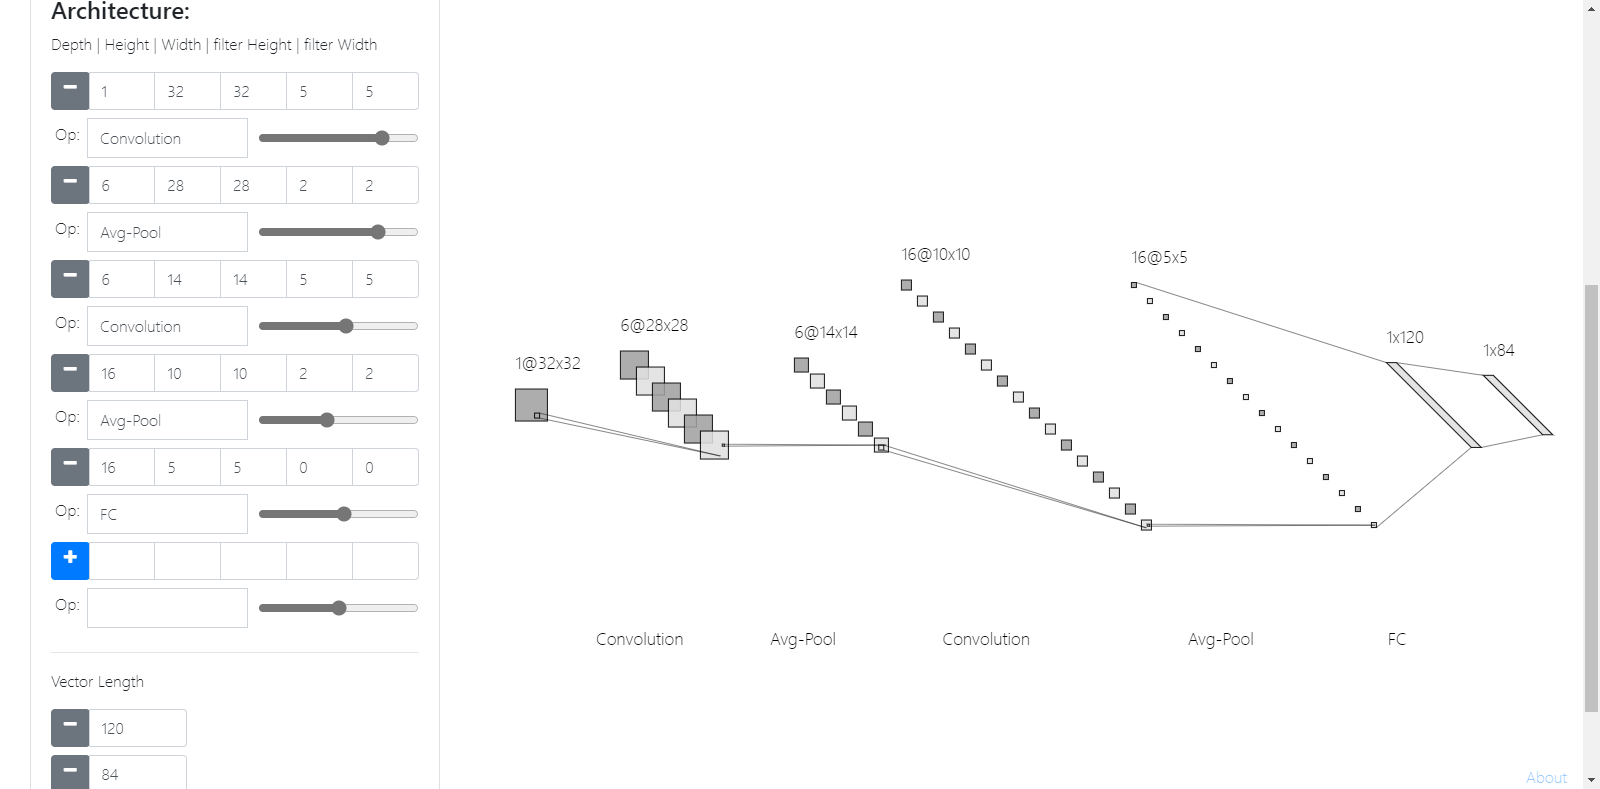
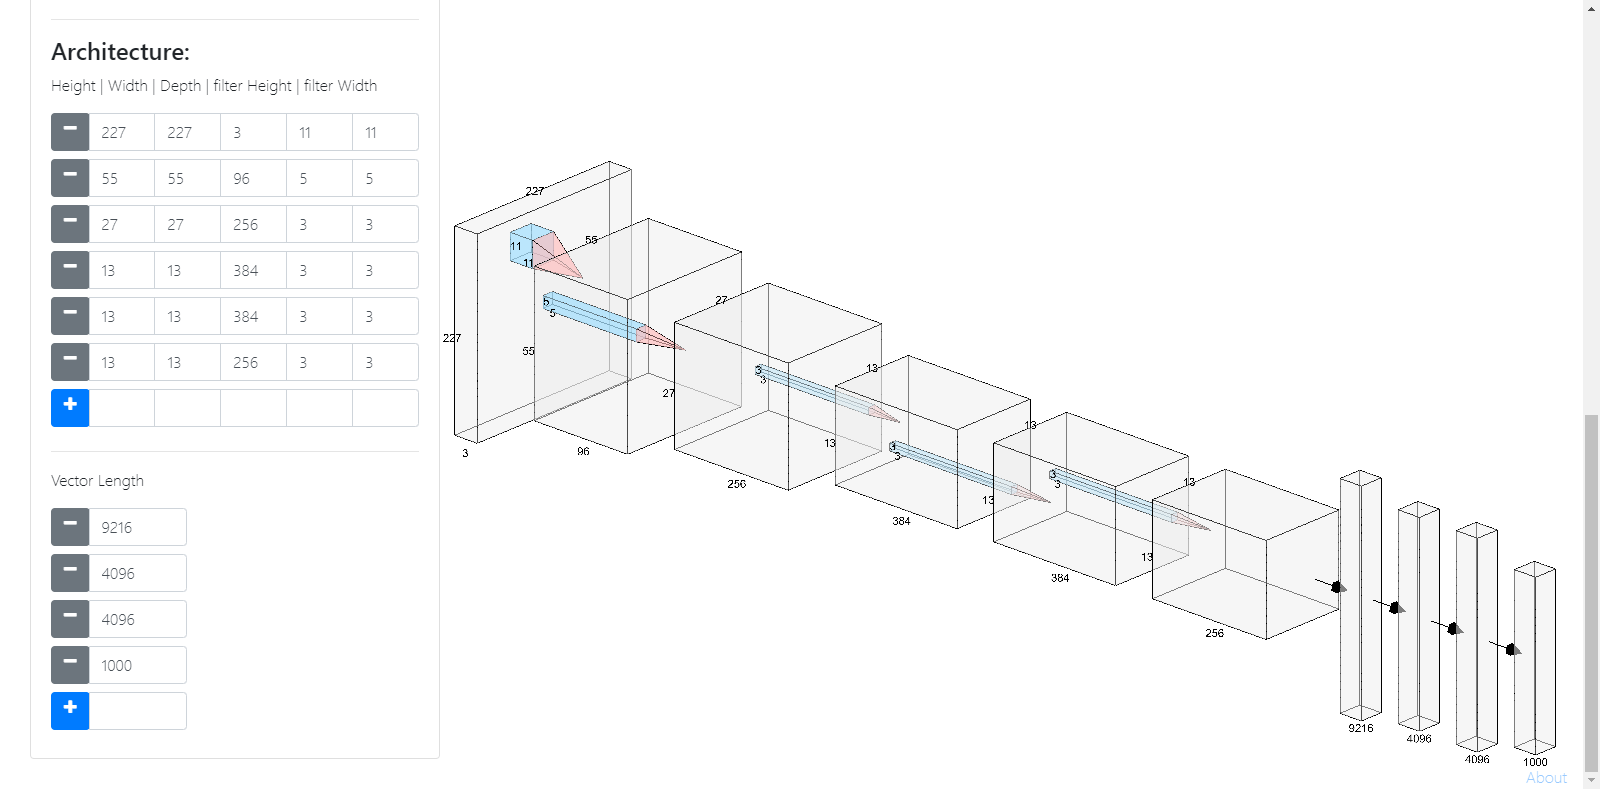
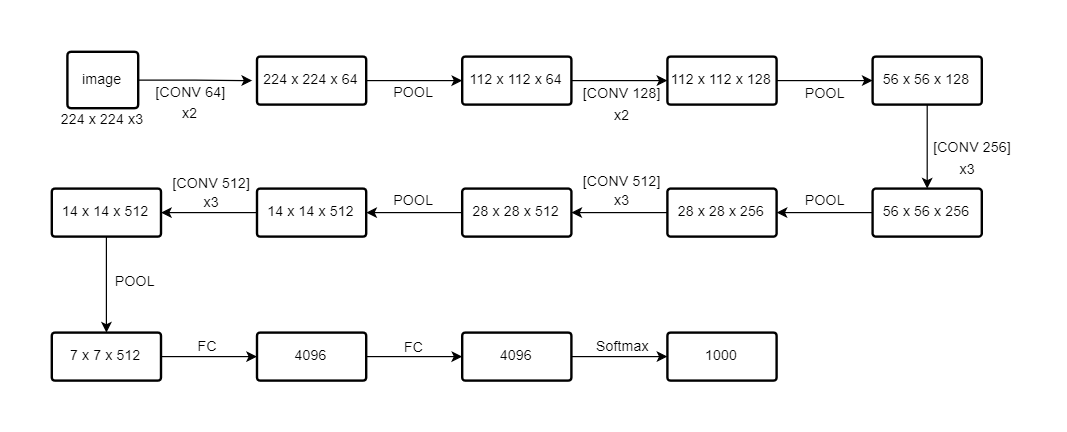
讲一些经典的网络结构,LeNet-5、AlexNet、VGG-16。
试了一下画网络结构。
用的是NN-SVG,http://alexlenail.me/NN-SVG
感觉就是没法标注出filter的大小,定制化程度不是很高,感觉视频中画的就很详细、通俗易懂。
效果如下:
LeNet-5:
AlexNet:(省去了池化)
VGG-16:(用流程图画的,same卷积)
另外一些拓展内容:
1.阅读以往文献可能会发现用sigmoid和tanh比较多,而没有用ReLU。
2.AlexNet原文用到了局部响应归一,也就是把同一像素不同通道归一,但是后续证明这不太管用。
2.3
网络太深训练会很难,视频里讲到因为会出现梯度消失和爆炸等问题。
看了这篇文章,我对这个问题有了另一个理解。链接:https://www.zhihu.com/question/64494691
当输入模值恒大于1,多层回传,梯度呈现倍数增长,而这一过程不断重复,就会一直增长到nan。这就是梯度爆炸。当输入模值恒小于1,多层回传,梯度呈现倍数减少,而这一过程不断重复,就会一直减少到0。这就是梯度消失。
但是现在大部分框架,都有采用Bacth Normalization(简称BN),而BN的作用本质上也是控制每层输入的模值。
我的理解是网络太深训练会很难,因为模型会退化。
当你层数增加到一定程度时,训练误差在下降一定之后又会反升。
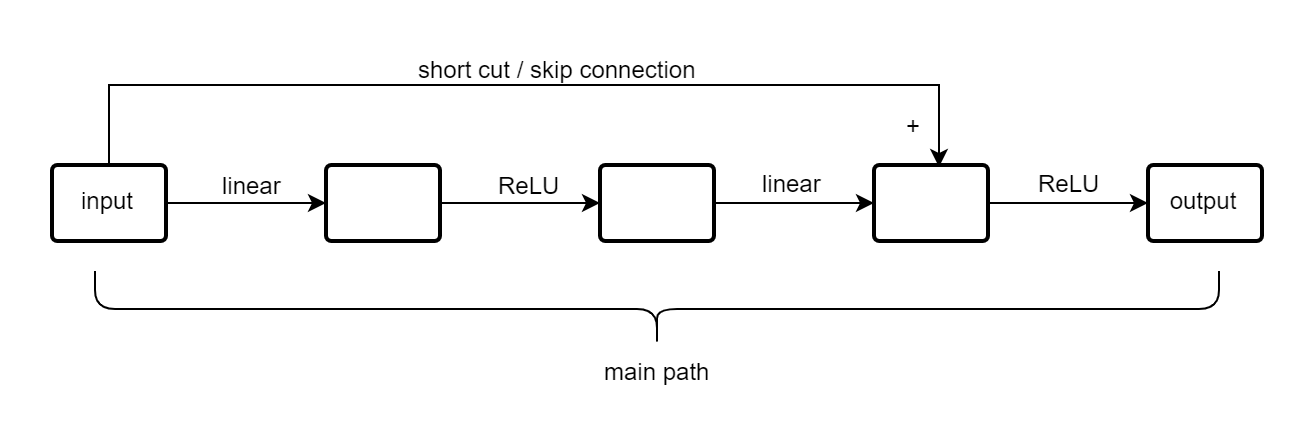
ResNet是使用了残差结构的网络,使用了跳跃连接。
在网络较深的情况下,训练误差也可以保持下降。
残差块结构如下:
2.4
首先说明ResNet至少不会导致网络输出质量下降,
由于有跳跃连接,残差块偏向于学习恒等函数,output趋向于等于input。
所以我们加入残差块,不会影响网络的能力。
而残差块一方面解决了网络深度的问题,保证梯度下降。
而且如果参数学习得好的话,一定程度上可以提升网络的表现。
残差块因为有跳跃连接,要保证相加,就要维度相等,所以一般都用same convolution。
如果维度不相等,就要类似乘以一个项,将它的维度转到相等。
2.5
1 * 1卷积其实可以理解成全连接,图像大小不变,而且可以通过滤波器的个数确定输出的通道(比如降通道)。
2.6
Inception块是指对一个图像进行多种操作后拼接起来。
比如先1 x 1的卷积,然后3 x 3的same卷积,或者same padding的max pool。
三者输出的图像都是一样的,然后将三者拼到一起,组成一个输出,大致如下。
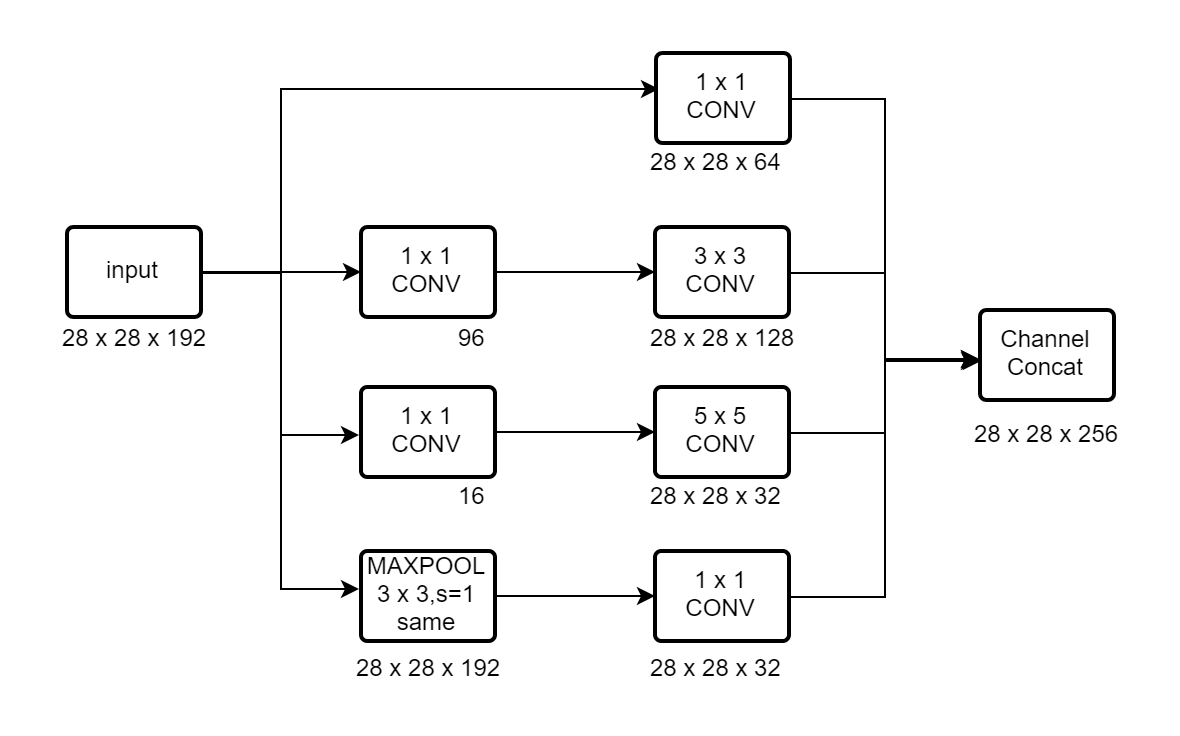
另外讲到合理设计1 x 1的卷积作为瓶颈层,降低计算量。
大致原理其实就是在两个较大维度的层之间引进一个较小维度的瓶颈层,
将计算量变成两个较小的数相加,而不是直接两个较为维度直接做运算的相乘。
2.7
Inception网络又叫做GoogLeNet,其实就是由Inception块组成。
Inception网络的做法是引出旁枝,也就是在隐藏层就接出全连接然后softmax进行预测。
为了来说明即使在网络的开始或者中间,他们的预测都不算太差,也一定程度上避免了网络的过度学习。
2.8
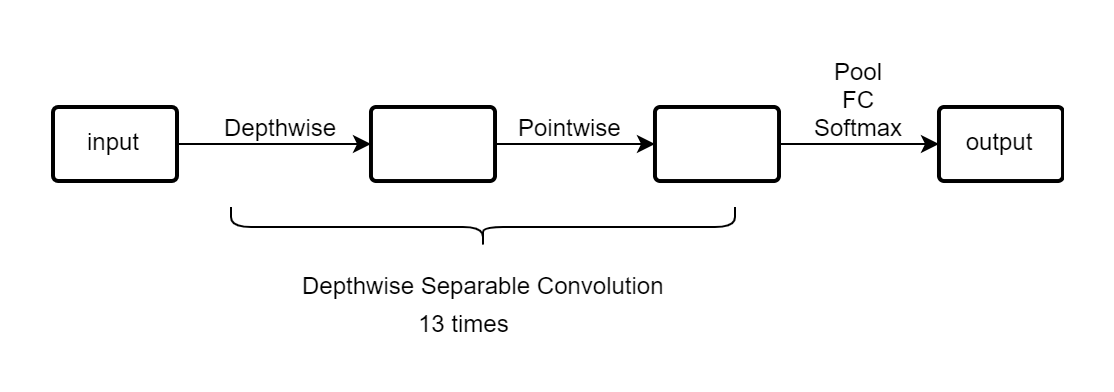
深度可分离卷积(Depthwise Separable Convolution)可以很大程度的降低计算量。
原理其实在于原本假设一个 x x 的图像,你要卷积就需要一个 x x 的卷积核。
然后假设有个卷积核,最后的图像也就是 x x 。
那么计算量就是 x x x x x 。
深度可分离卷积分为两步走,第一步是Depthwise(深度卷积),第二步是Pointwise(点卷积)。
Depthwise这一步其实原理上和普通卷积是一样的,但是没有把深度合并,
所以结果图像是 x x 。
计算量就是 x x x x 。
Pointwise这一步就是用k个1 x 1 x 的卷积核对Depthwise的结果进行卷积,
得到最终图像就是 x x 。
计算量是1 x 1 x x x x 。
总的计算量就是 x x x 。
所以可见节省的计算量是,一般如果是3,是上百的数,
那么节约的计算量就有约。
究其原因就是普通卷积其实将同一位置不同深度的计算量求和到了一个维度,
这一步其实就是计算量大的关键,而深度可分离卷积很好地避免了这一步,并在后续将其合并到了一起。
2.9
MobileNet_v1:
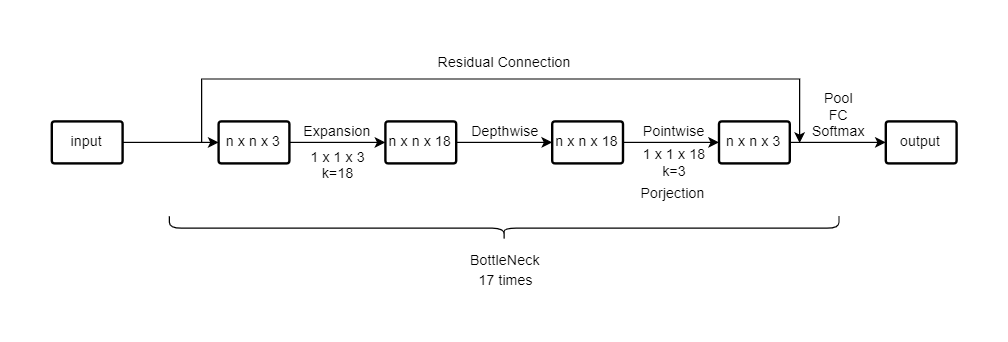
MobileNet_v2:
2.10
简单讲了EfficientNet,之前我也有了解过。
简单讲就是寻求输入图像分辨率,网络深度,网络宽度的最佳组合。
深度越深可以捕获更复杂的特征、但是太深也面临难训练的问题,而且网络到达一定深度增益会减少。
宽度越宽可以捕获更细的特征,但是如果宽深比差太多,也没法很好捕获到特征。
分辨率越高可以捕获更细的特征,但是带来的就是计算量的增加。
EfficientNet采用复合缩放,寻求满足计算资源的最佳、和。
详细学习参照:https://zhuanlan.zhihu.com/p/67508423
2.11
教你怎么用github下载开源代码
2.12
迁移学习,使用预训练权重。
如果训练数据很少的话,可以直接冻结网络,然后将最后的Softmax层改成自己所需的,训练。
如果训练数据较多的话,可以直接冻结网络部分层,然后将最后的Softmax层改成自己所需的,训练。
如果训练数据很多的话,可以不要冻结,然后将最后的Softmax层改成自己所需的,训练。
2.13
由于数据太少,我们需要数据增强,在原有的数据上增加一些数据。
常用方法有
1.垂直镜像(Mirroring)
2.随机裁剪(Random Cropping)
3.色彩变化(Color Shifting)(增强网络在色彩变化的健壮性) PCA 主成成分分析
4.旋转(Rotation)、剪切(Shearing)、局部变形(Local warping)(不常用)
2.14
大致讲了一下数据所需大小以及网络人工设计以及手动处理程度。
讲了如何提高网络作用在基准数据的效果(会降低效率,难以成为产品)
1.集成,可以多个网络输出取平均值。
2.多重剪切 10-crop(原图像中心左上右上左下右下 以及垂直镜像对应)
第三节
3.1
这节讲的是目标检测,以下有三个概念,是层层递进的。
1.图像分类(classification)
2.图像分类并定位(classification of localization)
3.目标检测(object detection)
首先是图像分类并定位实现。
其实就是在我们分类的基础上,要多输出一个box来定位。
box的位置由四个参数确定,,
分别代表box中心点的,将图像左上角定为(0,0),右下角定为(1,1),是分数。
以及box的宽和高(也有可能是分数,表示是某一线段的倍数)。
具体实现就是在网络的输出多加入四个参数,打label的时候也要对应打上四个参数。
一种可能的输出是 。
代表是否有检测对象,代表box四个参数,代表分到哪个类(class)。
当时,损失函数要计算整个向量,当时,损失函数只需要计算。
3.2
这节课讲的是特征检测,输出坐标,比如人脸关键点识别,关节点识别等。
3.3
这节课讲的是滑动窗口检测。
假设你训练了一个模型,输入是一个类别(比如车),
图像大小接近这个类别的最小外接正方形,然后输出预测结果。
这样子就可以用一个滑动窗口,以一定的步长遍历图像,
每次都把这个窗口调整到网络输入一样的大小裁剪图像,输出预测结果。
然后不断放大滑动窗口的大小,做同样的操作。
但是这个方法有个很大的缺点,就是计算量太大了!
步长大检测效果又不好,步长小计算成本又太大。
3.4
用卷积实现滑动窗口检测,这个想法挺奇妙的。
假设原来的检测网络是这样子的。(FC 5 x 5代表以5x5的卷积代替全连接)

如果我们需要处理16 x 16 x 3的图片,则需要4个滑动窗口裁剪原图像4次,
然后输入网络,对应输出4个1 x 1 x 4。
用卷积实现的话是这样子的。

直接将大图片进行和网络一样的操作,你会发现其实最后的2 x 2 x 4的输出就是滑动窗口的4个输出的拼接。
共享了大量的计算,减少了计算量。
(CAD画图好方便)
3.5
用卷积实现滑动窗口,使得算法高效了许多。
但是还是有个很大的问题,就是检测到的窗口不准确。
而且很多时候我们检测的物体并不是正方形的。
所以提出了YOLO算法,以下是个人理解:
1.假设原始图像是 x x 3,我们将其分成 x 个图像。
2.这 x 个图像都对应一个输出 ,假设长度为。
3.那么网络输入就是 x x 3,输出就是 x x 。
(yolo v1的y的长度 是30,包含两个box以及20个类别,其中一个box有五个参数)
补充:
YOLO算法是以目标物的中心点来确定目标物所在方格,定义如下。
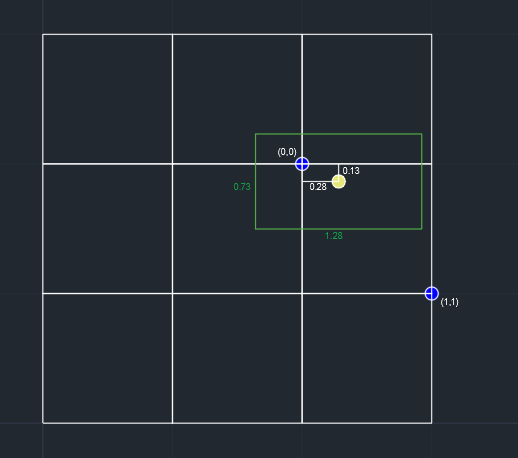
其中绿色框代表检测的物体。
,代表相对于方格的位置。
,代表框的长宽占方格边长的占比。
3.6
这节课讲交并比(IOU),用来衡量目标检测算法的优劣。
也就是你的输出框和真实框的交集比上并集,越接近1效果越好,越接近0效果越差。
3.7
非极大值抑制(Non-max suppression)
NMS是为了来解决很多box都指向了同一个物体,我们从中挑选出最大的,并抑制其他的。
具体操作就是先找出这个类别中最大的,然后抑制跟这个框IOU大的其他框,然后重复这个过程。
在用NMS之前,会直接先筛除掉一个阈值以下的框,比如筛除的框,降低计算量。
我原本有个想法就是直接对每个类别,取最大的box不就行了,排个序,都不用用到NMS吧。
但是后来想了想,如果一个图像中出现两个同类别的物体,那便找不出对应这两个物体的框了。
NMS即能保证不会多个框指向同个物体,也保证同一类别的多个物体可以被框选。
3.8
以上算法一个格子只能检测一个物体,虽然当格子分得足够多时,出现这种情况的概率就很小。
使用anchor_boxes就可以实现一个格子检测多个物体。
假设输出是。
前后分别对应两个anchor_boxes对应的形状的输出。
具体做法是先定义anchor_boxes,
比如第一个定义扁平的框,用来检测车,第二个定义瘦高的框,用来检测人。
当一个格子内出现物体时,就看这个框的形状和anchor_boxes哪个像。
比如如果是扁平的,那么就是1,然后后续参数对应,瘦高同理。
但是其实很多时候同类别的,他的anchor_boxes也相似,
假设是都是第一个类别,
很少可能出现的情况,
而且很少出现同类别的两个物体的中心点在同一个格子内。
所以有个疑问,是不是可以直接。
好像yolo v1中就是这样子的。
3.9
总结一下yolo的过程。
training:输入图像,将图像分割,给每个格子打标签,对应最终的输出。
predict:输入图像,输出每个格子对应的结果,剔除值小的,对每个类别进行NMS。
3.10
RCNN:伴随区域的CNN,也就是用其他算法尝试选取有意义的区域来运行目标检测算法。
随之后来速度不断提升的fast RCNN、以及faster RCNN。
3.11
这节课讲的是语义分割,其实就是对所有像素分类。
还有另一个术语是实例分割,他们两者的区别是:
语义分割只对类别分割,实例分割是分完类别之后还要对实例分割。
比如语义分割只需要区分人和背景,实例分割就要做到区分人和背景的同时,将不同的人也分割出来。
3.12
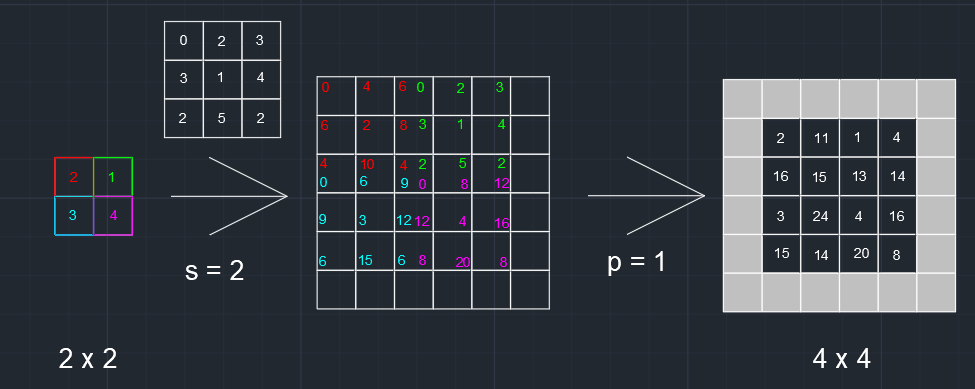
这节课讲的是反卷积(transpose convolution)。
之前看过unet的上采样,看一个教程说是插值,这节课看完才知道原来是反卷积。
具体实现如下:
3.13 && 3.14
这两节课讲UNet。图片参照论文。UNet论文:https://arxiv.org/abs/1505.04597

网络结构比较简单。
就是不断卷积池化下采样,可以理解成编码过程。
然后不断卷积反卷积上采样,可以理解成解码过程。
然后同维度的层数之间concat拼接,保证了网络既有浅层特征又有深层特征。
可以理解成深层的网络可以大概把物体分割出来,然后浅层的网络把边缘细节给分割出来。
这样子两者一结合,就可以较好地实现语义分割。
UNet学习链接:https://www.bilibili.com/video/BV1Dy4y1x7zt
顺便记录一下UNet++,UNet++论文:https://ieeexplore.ieee.org/document/9380415
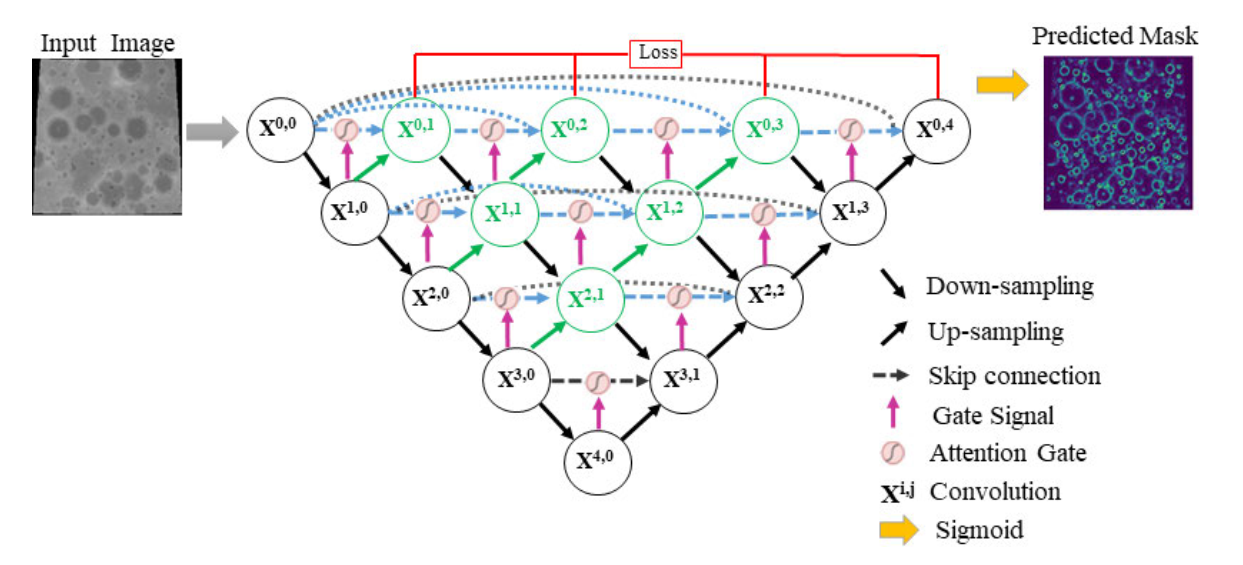
UNet++就是在UNet基础上,将较近的层之间做了拼接,并且引出多个loss。
